
ONE ROOM CHALLENGE | WEEK 2 - budget and schedule
Planning a remodel can be a daunting task, especially if you’ve never done it before. I’m beginning Week 2 of the One Room Challenge and my schedule has already adjusted too many times to count. The best advice for planning a big remodel like a bathroom or kitchen is to plan! Plan as much as possible. I’m here to break down how I’m doing it (and how we also do it for clients) and share week by week what I’m tackling in the remodel of my only bathroom!

PLAN
Give yourself plenty of time to make ALL of your design decisions, down to the last detail, as well as get things ordered and to your home in one piece. If one item changes, it’s likely going to affect others and sometimes the entire design. So knowing every detail makes it easier when one item changes instead of trying to move forward still needing to select a handful of items.
What I start with will never be what I finally install. Things will be delayed, schedules will creep and something unexpected will come up. I started planning in February and got really serious in March and had most everything finalized by mid March.
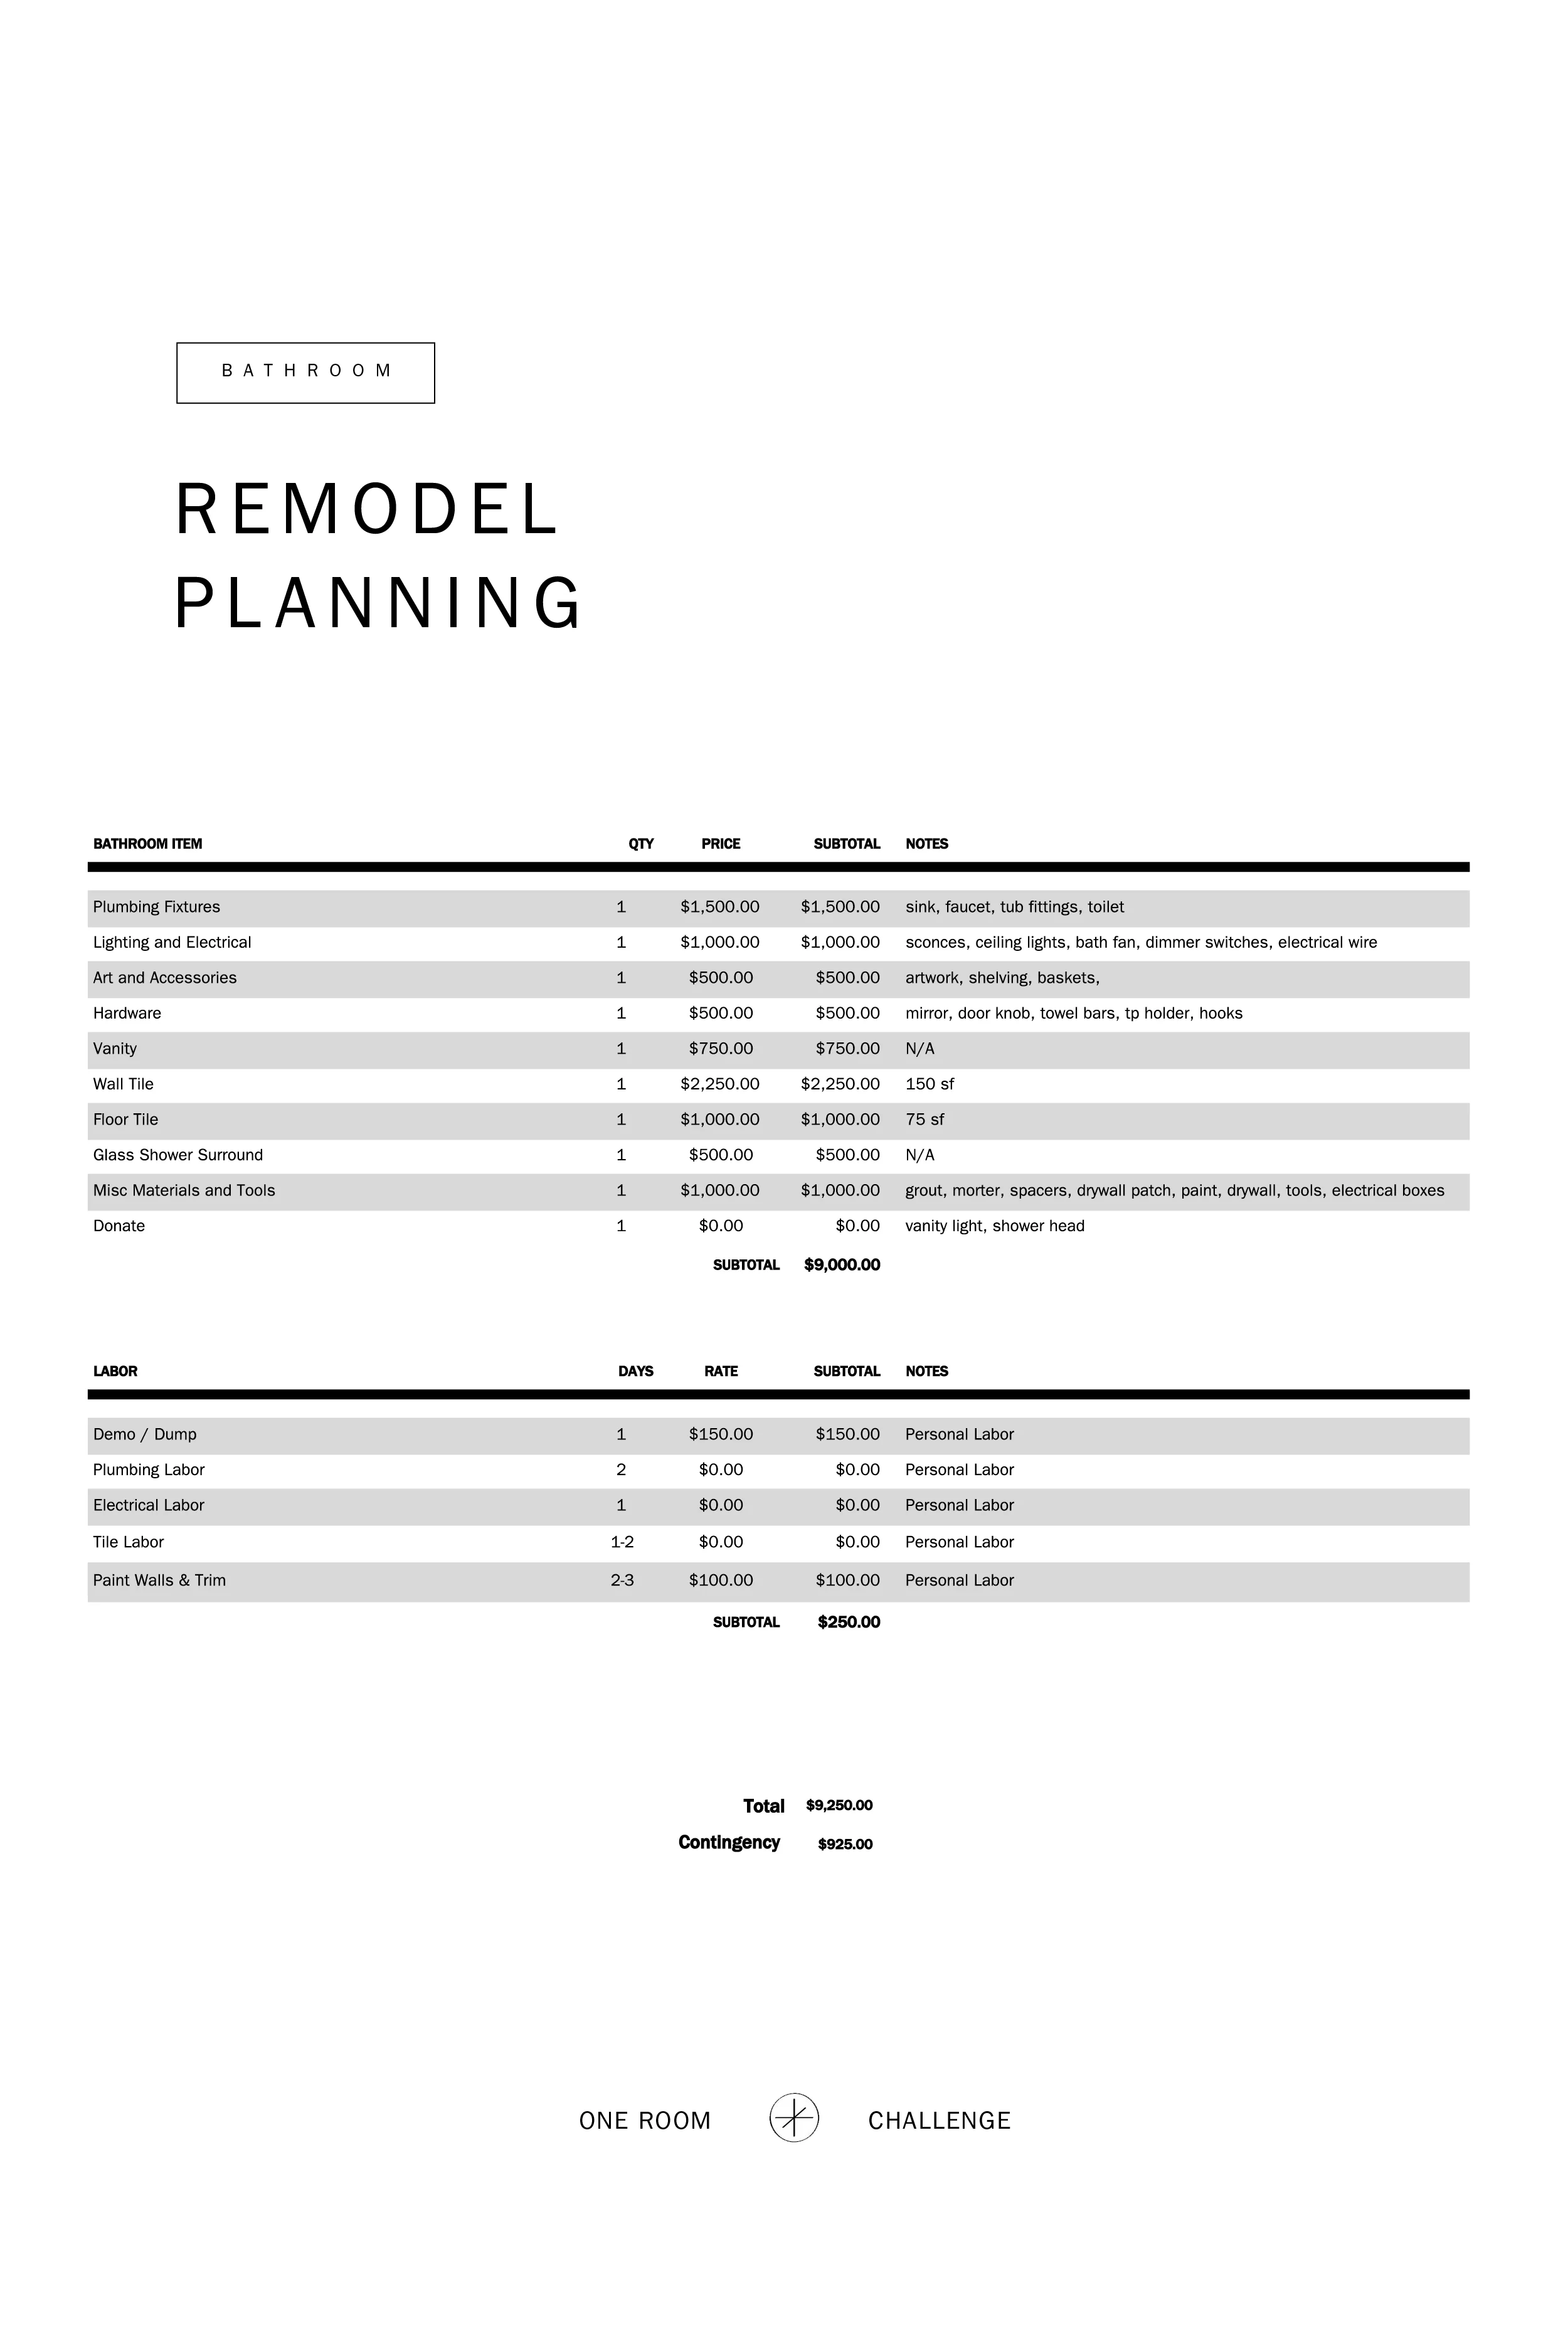
Most of us aren’t blessed with an expendable income where we can select anything we want for our home. Aside from making design selections, understanding your budget up front is incredibly important. People are always blown away by how expensive a bathroom remodel is in reality. If you don’t have a budget, there’s a good change you’ll come in extremely over that number floating around in the back of your mind, resulting in the need to rework everything. Understanding how much money you want to spend up front is key. When you know what your budget is, you can spend less time searching for things that don’t fit your budget and more time making decisions on items that holistically fit your budget.
Before selecting anything, I always start with my budget. Even if it’s just jotting down a few numbers, it’s a starting point. It’s going to change and that’s ok. Change is what the design process is all about. If I don’t know what something costs, I put a number to it so I can start with something, then I get estimates. We always create budgets for clients. Or they have a number they want to spend in mind and we work backwards.
CREATE A BUDGET - even if you don’t know what things cost, take a guess
Designing for a remodel is incredibly dynamic. Change one thing and many other items need to be adjusted. You can’t just look at one part, it has to be the entire room for a for an accurate budget. Below, I shared my starting.
Here is a link to a template for creating your own budget. It’s a great place to start and the next step in planning your own realistic remodel. Check it out, and copy and paste it, then add in your own info. Get specific, add lots of lines, this is just a starting point! It all goes back to planning, the more you know, the less surprises you have!
Aside from plumbing, I’m doing all of the labor myself. You can easily update this spreadsheet to add a line item for labor for all of the different trades. As an example, I would have labor on the following:
Demo - removal of materials, fixtures, walls, trim
Plumbing - rough in valves for the shower and sink, installation of the trim pieces
Electrical - rough in locations for new switches and outlets
Drywall - covering patched open walls
Tile - floor tile and wall tile prep and install
Carpentry - shower niche install, trim work, door hardware, hang shelving, mirror, hooks, towel bars, etc
Paint - walls, ceiling and trim
Custom - vanity fabrication
Why would I do EVERY SINGLE thing on this list but hire a plumber? And get this, my dad was a plumber before he left my grandfather’s plumbing company to start his own business. He didn’t teach me a thing about plumbing. I think he was saving me but to his credit, or maybe he was just being a dad and helping me.
Plumbing is complicated and extremely messy if you don’t do it right. The last thing I want in my remodel is a leaky shower or even worse, a leaky toilet. And for a bathroom remodel, it’s mostly plumbing and tile and I can handle a slightly off center tile or two.
Below and here is an outline for the work that is and will be happening along with an estimate for how much time I think it will take for each. Because bathrooms are small, it’s rare to be able to have different trades doing work on the same day. And it’s incredibly difficult to plan the schedules of almost 10 different crews to make the work line up back to back. Think about making plans to spend a day with 10 friends. You have to schedule a month out for that one day to line up. And if someone gets sick or has to pick up their kid from school early, the schedule slides because of life.

WORK WITH EXPERTS
I worked with Helen at Ferguson Kitchen and Bath in Portland and Mike from Rose City Plumbing. You can make an appointment here. You’ll want to spend a few hours picking out your fixtures and can leave that day with a quote for everything.
Reasons to work with an expert:
No one talks about the valves. The valves are what make showers turn on and off and are behind the wall. They are specific to brands, they divert water and change temperature. Valves are the most important piece to get selected correctly because once the tile goes up, you have to remove the tile to change them. Do it once, do it right.
Locating valves, supplies for shower heads and tub fillers and diverters in the wall without experience takes a lot of practice or patience. Be sure to either have a drawing where everything will go or have a conversation with your plumber.
There are a million different styles and types plumbing fixtures. Seeing fixtures in person at a dealer’s showroom is incredibly helpful. Most plumbing fixture websites are difficult to navigate and it’s nice to have a real conversation with someone about how you want your shower to function than deal with online chat forms or 1-800 numbers to get the answer’s you are looking for.
Invest in good plumbing fixtures. This is something you’re going to touch every single day so make sure you like touching it.
Have your plumber warranty his/her work and purchase all parts for the installation. It’s a little more expensive but if something goes wrong, you’ll have to deal with getting the parts replaced and returned and it’s much easier if your plumber can do this for you. It will save you a headache.
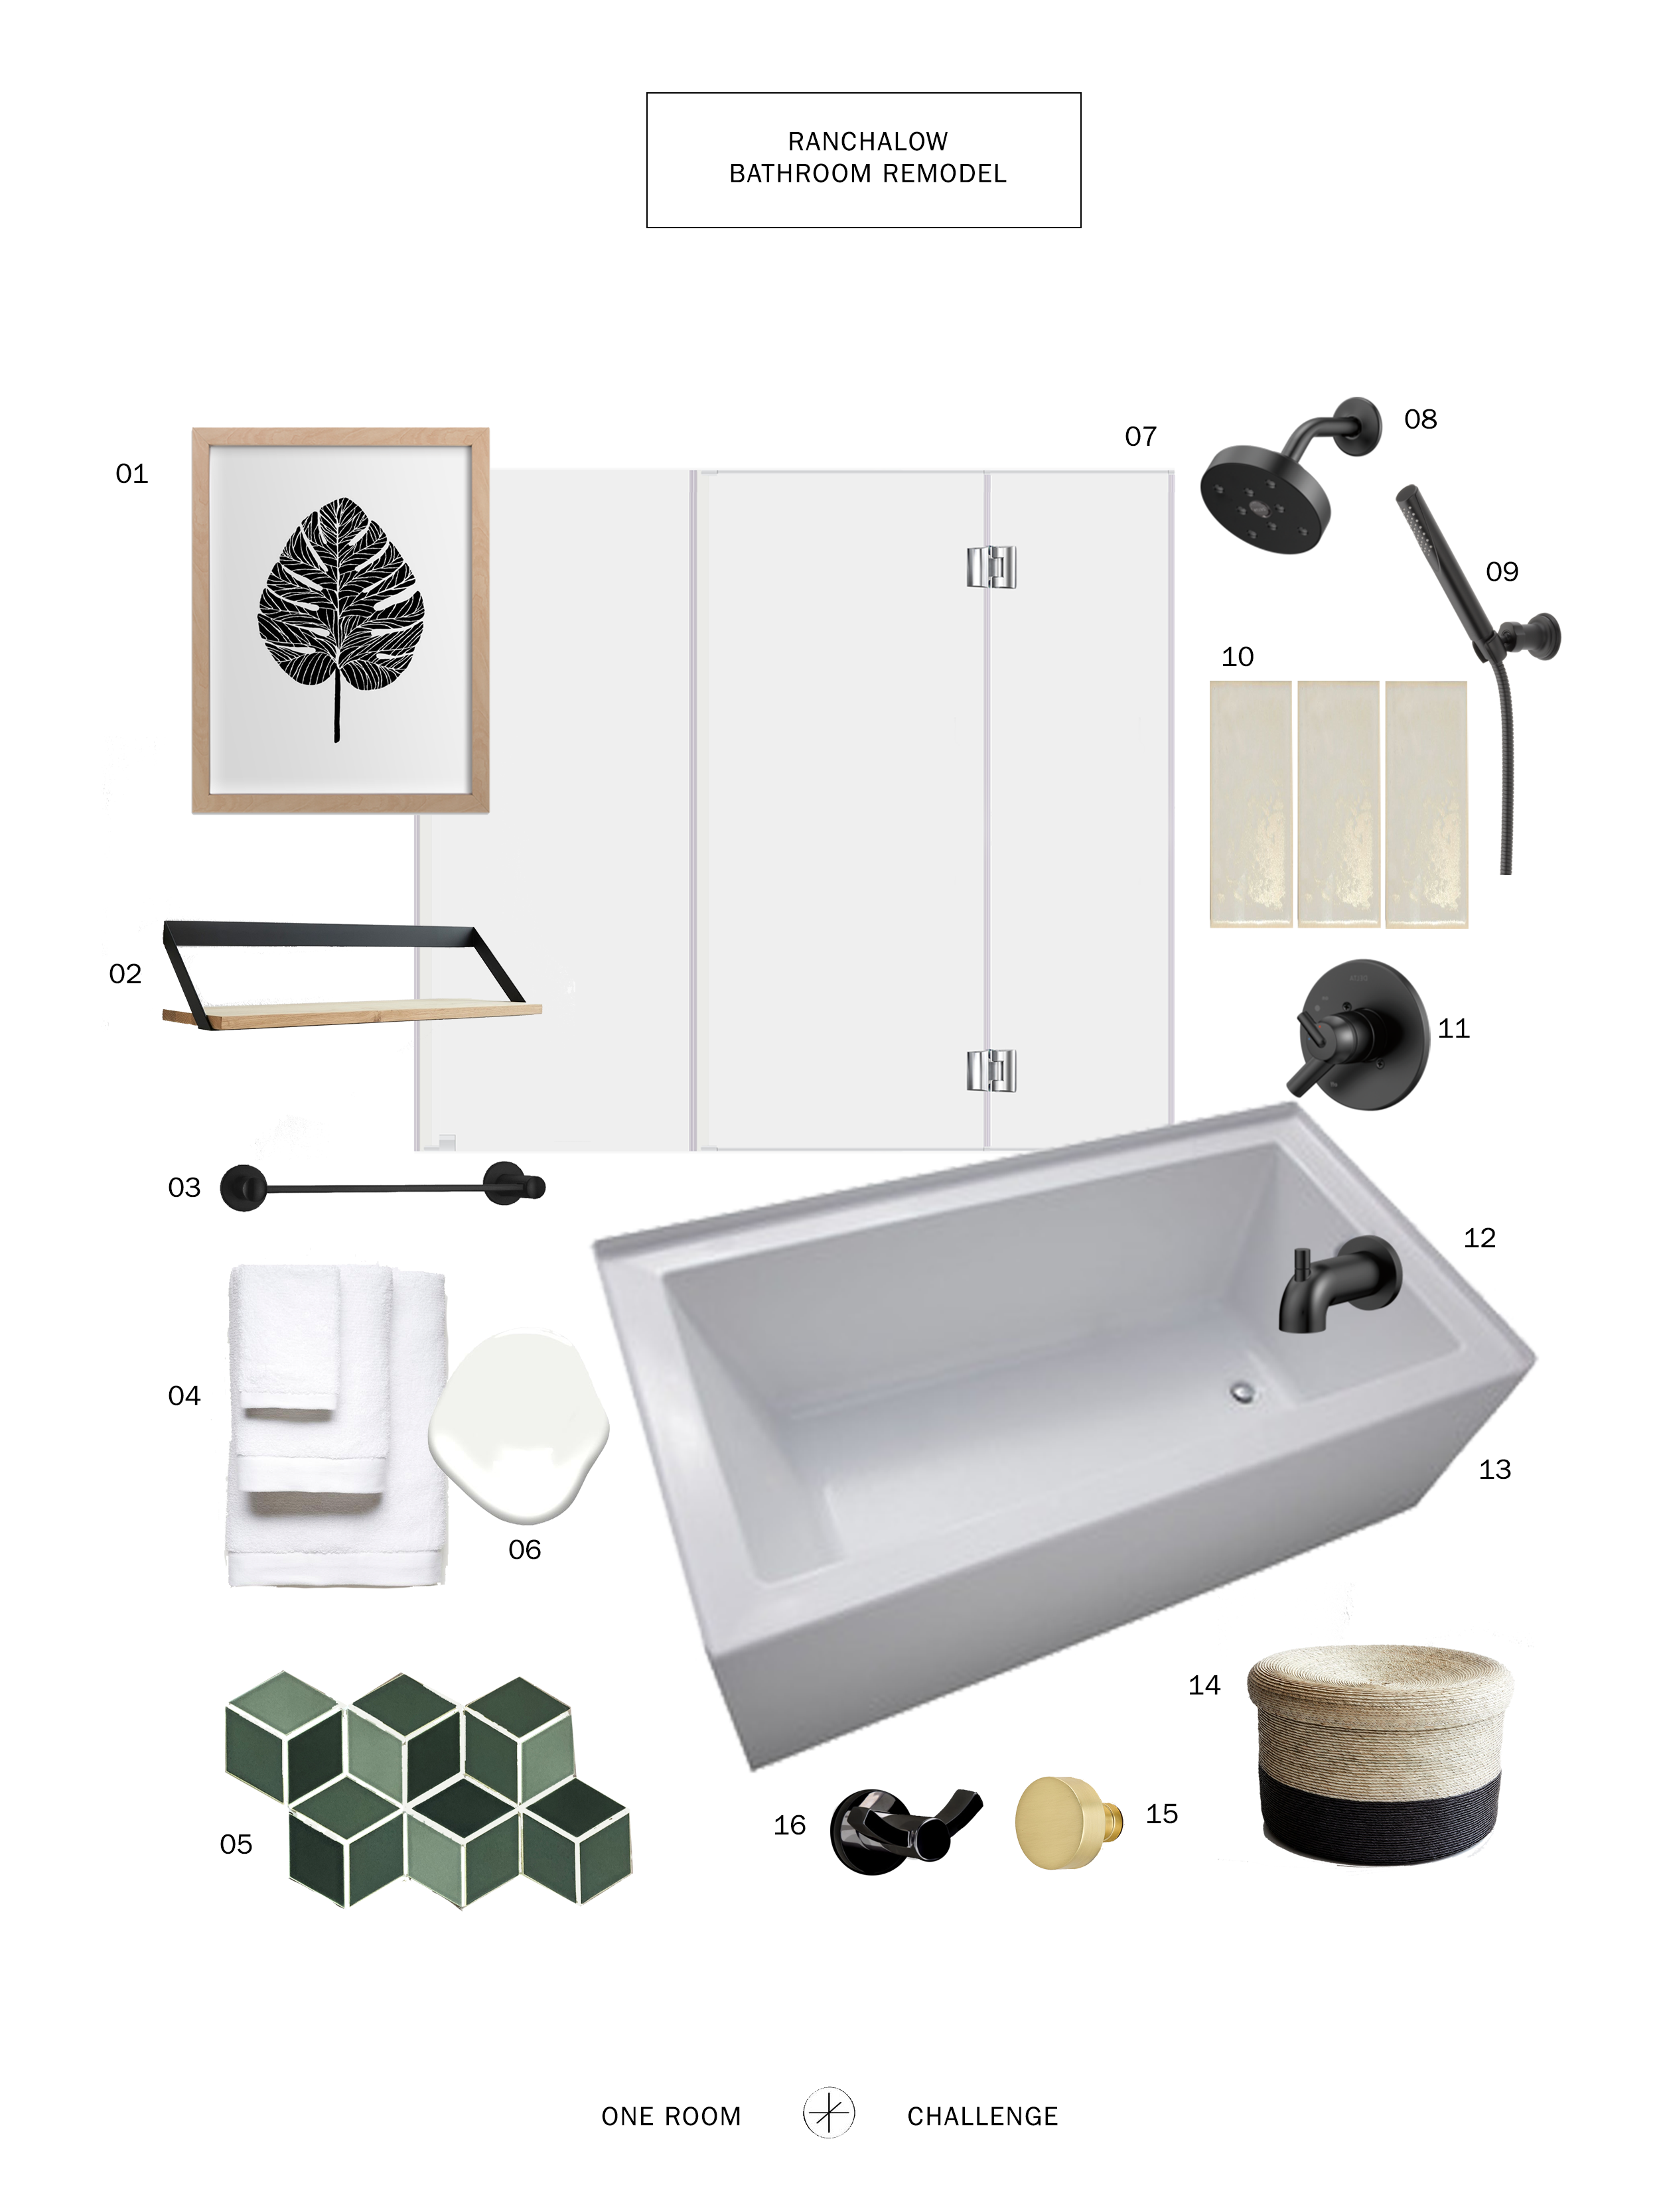
Once you have a budget, even a loose budget, you can start shopping. Break down the plumbing fixtures by line item; sink, faucet, shower head, valves, tub spout, etc. Then do the same for lighting - sconces, ceiling lights, bath fan. Put a number to each of these items. Then start looking for things that fit the budget.
Confirm lead times and give yourself one month from order to pick up for all in-stock items. In stock doesn’t really mean pick up today. It means pickup in a week, and sometimes more. There’s something about plumbing fixtures that is always delayed and the last thing you want is to delay your project due to a toilet tank or a shower arm that’s lagging behind.
Remodels should be exciting and not stressful. So planning as much as you can helps make the unknown a little bit easier to digest.

Here’s how I’m tracking:
Week 1 to do list: April 3 - Project Overview (follow along on Instagram stories to see more behind the scenes)
demo bath room- buy a last minute tub!
- pick up grout, wonderboard, screws, floor transition strip
- install shower valves (Mike at Rose City Plumbing)
frame shower niche location- remove the bath fan
paint the ceilingreplace and patch all drywall
Week 2 to do list: April 10 - Blog Post on Remodel Order of Operations / Design Downloads / Plumbing Selections, Installation and Why/When I Hire an Expert
relocate the electrical outlets and sconcespatch drywall- skim coat walls
- paint walls
- paint trim
- tile wall
- grout wall
- replace the bath fan
Week 3 to do list: April 17 - Blog Post on Tile and Tile installation / Ordering Materials
- remove toilet - tank delayed until 4/16
- prep the floors by adding a tile ready subfloor
- tile floor
- grout floor
Week 4 to do list: April 24 - Blog Post on Electrical / Hardware Selections / Accessories
- install the vanity
- install the sink and plumbing for sink
- install shower trim
- install shower doors
- install door hardware
Week 5 to do list: May 1 (finish any last minute details)
- replace light switches
- install accessories (hooks, towel bar, shelves)
- hang artwork
- hang mirror
- trim carpentry
- paint (walls, trim, door)
Week 6 to do list May 8 (final post with finished photos)
- paint touch up
- style
- photograph final blog post with finished photos!
I am so excited to see how the others designers are progressing. Be sure to check out the other amazing designers. Thanks for following along!
WEEK 2
At Home With Ashley | Casey Keasler | Dorsey Designs | The Farmhouse Project | Home Made by Carmona | House of Funk| House of Jade Interiors | House Seven Design | House That Lars Built | Inspired by Charm | Jana Bek | Jessica Brigham | Kelly Golightly | Murphy Deesign | The Pink Pagoda | Sarah Gunn | Sherry Hart Designs | Sugar & Cloth | Veronica Solomon | Vintage Revivals | Media Partner BH&G | TM by ORC